

« Previous step: Phase 3 final report
3 pages is the minimum — to be honest your website should have at least 5 pages.
Grades 11 and 12 must create an HTML website to present the results of their investigation. A working, three-page website framework can be created before the topic is even announced — the content can be added and marked up once the Phase 3 Word Report is finished. You must attempt to use EVERY tag & every attribute you have learnt about at least once! Consult the official NSC HTML Tag Sheet for the complete list. You must use Notepad++ to code your HTML — you may not use Dreamweaver or any other web authoring software. Read my post Coding HTML with Notepad++ to get the most out of your code editor.
In this tutorial:
Required knowledge:
See also:
All folder & file names must be lowercase, no spaces, no special characters!
1. HTML folder
All your HTML files and images (and any other resources) must be in a folder named website (lowercase) in your Phase 3 folder. These are conventions that web developers use.
All website assets (HTML files, images, etc) must be saved in this single folder.
If you would like to organise your website in a more advanced, real-world way, read the post Organising website assets.
2. HTML Boilerplate
Create your first page — your home page — and save it as: index.html (all lowercase) in your website folder.
Naming your homepage index is standard practice (whether it be index.html, or index.php). Most web servers are configured to serve up a page named index by default to save a user from having to type in the actual name of a web page as well as its address.
index.html must have:
You MUST include
<!‑‑ COMMENTS ‑‑>in your code.
- a title (
<title>) - a heading (
<h1>) - a navigation bar (“menu”) with links to:
- the home page for your website, index.html
- two additional pages (a minimum of 3 pages is required), for example:
- data.html
- bibliography.html
- a content section with a sub-heading (
<h2>) - a footer section
The below HTML “boilerplate” can be used for your basic page:
<!DOCTYPE html>
<html>
<head>
<title>PAT 2024 — Your Name</title>
</head>
<body>
<!-- BANNER -->
<img src="logo.png" alt="logo" width="80" height="80" align="right" />
<h1><font color="DarkGreen" face="Arial">PAT Topic Goes Here</font></h1>
<!-- MENU -->
<hr />
<p><a href="index.html">Home</a> | <a href="findings.html">Findings</a> | <a href="bibliography.html">Bibliography</a></p>
<hr />
<!-- CONTENT -->
<h2><font color="DarkGreen" face="Arial">Introduction</font></h2>
<p>Text goes here...</p>
<p>More text goes here...</p>
<!-- FOOTER -->
<hr />
<p align="center"><font color="DarkGreen" face="Arial"><sup>©</sup>Initial Surname</font></p>
</body>
</html>
The Learner Guide says that the different sections of the web page must be distinct which is why I have used horizontal rule lines <hr /> above and below the “menu” section and above the “footer” section. Remember that you can style the horizontal rule element and nothing prevents you from being more creative in using a suitable image in place of the horizontal rule line or using some basic CSS to add a different background to the menu section.
Adapt the names of the additional two pages and their links in the menu section to suit your needs — you may want to have many more pages.
3. Navigation
I have used the | (“pipe”) to separate the hyperlinks that form my menu bar. Be creative and try a symbol or suitable inline image of your own.
Each page must have an identical menu in the same position.
4. Add some text style
Add some style to your headings using a different font style and colour. Read the post Expressing colors in HTML for more.
<h1><font color="DarkGreen" face="Arial">PAT Topic</font></h1>
Do NOT underline, ever — underlining is reserved for hyperlinks. Remember to keep your formatting consistent and professional. Check your textbook for the section dealing with user-friendly design and the basics of good web design.
If you choose to up your game a little and use CSS for this (or any other reason) be sure to fulfil the requirements of the PAT by using the standard HTML tag attributes elsewhere in your website. Read more about starting with CSS here: Starting simple CSS.
5. Add some color
Adding colour to your website will make it stand out from the boring black-text-on-white-screen variety! The Internet is awash with ideas. The two palettes of complimentary colours below are a small sample of what is available:


6. Duplicate
Once you have styled up your index.html file, save 2 (or more) copies with the names findings.html and bibliography.html etc.
Edit findings.html and change the sub-heading (the text between the <h2> tags) in the body section of the page to read: Findings
Edit the sub-heading in bibiography.html in a similar fashion.
Now open your index.html page and you have a basic website consisting of three linked pages!
Try to keep your page content “above the fold“.
7. Content
Copy-paste content from your final report into the appropriate web pages and then tag the text with the appropriate heading tags, <h1>, <h2>, <p> etc. The Introduction from your Phase 3 report should appear on the index.html page, your homepage.
Don’t forget the obvious small touches such as adding <b> and <i> where appropriate. See the post on the <abbr> tag and add some extra-curricular tags to your content.
If you have a page with a large amount of content, consider creating a list of hyperlinks at the top of the page to navigate easily to the relevant location on that same page (as I have done on this page). This is described in the post Hyperlink to a location on the same page.
8. Citations
You will have copied the citations from your Word report document along with the rest of the text. Read the following post titled Adding citations in HTML for more information.
For bonus points and the coolest PAT in the ‘hood, use Chrome’s Create QR code functionality to create a QR code and past the QR code as an image in your Phase 3 Report!
9. Images
You need to include images on your website. Read my separate post Editing images for your website dealing with the correct handling of images for your website.
You have two simple options if you would like to include your Excel Charts on your webpage:
- If you have pasted your Excel Chart into your Word report, you can right-click copy the Chart and use Paste Special command to paste it as an image. You can then right-click Save as Picture… and save the Chart as an image file in your website folder
- You can screenshot your Chart using a screenshot tool (I use Greenshot) that outputs an image file.
In addition to the required src attribute, all your images must have width, height & alt attributes.
Remember that all your images need to be credited (see the post on Adding captions to images in HTML)!
Top tip: You could use Access’ super-efficient Export HTML Document function to output HTML.
10. Tables
You must have at least one HTML table — open your data.html page in Notepadd++ and create a table using some of your Excel data.
Use alternate row colours — also known as “zebra striping” — on your table to add some detail — you can do this in one of two ways:
- Plain old HTML
- using CSS
<!-- Zebra-striping in HTML table -->
<tr bgcolor="gray"><td></td><td></td></tr>
<tr bgcolor="lightblue"><td></td><td></td></tr>
<tr bgcolor="gray"><td></td><td></td></tr>
11. Bibliography
You can copy your bibliography from your final, Phase 3 Word Report, paste it as plain text in your bibliography.html page, and style it as an ordered (numbered) list.
URLs must be coded as hyperlinks using the anchor tag:
<a href="" title="" target="_blank"></a>
Remember, the href attribute must be a fully qualified URL (it must include the full protocol in the address, e.g. http://www.).
The inclusion of the target attribute counts towards the bonus marks available for using code from outside the curriculum. This attribute specifies in which browser tab or window the URL should open. The _blank attribute value results in the URL opening in a new tab.
For an in-depth look at opening a web page in a new tab read the following post: Open a Hyperlink in New Tab.
12. Citations
There seems to be no clear consensus on citing work on the PAT website. Suggesting that the <cite> tag (included in the DBE CAT curriculum in 2021) should be used to create citations is misguided as the w3schools.com website makes clear. My take on the topic is here: Adding citations in HTML.
If you recorded an audio or video clip for your PAT, embed it in your HTML!
13. Embedding your questionnaire
This is a showy addition to your website!
13.1 Embedding your Word questionnaire as a PDF
Save (Export) your Word questionnaire as a PDF in your website folder. Then follow the instructions in the post Embed a PDF in a webpage.
13.2 Embedding your Google Form questionnaire
If you used a Google Form questionnaire in Phase 2, you can embed the Google Form in your HTML page using the code snippet provided on the Embed HTML tab of the Send settings of your Google Form:
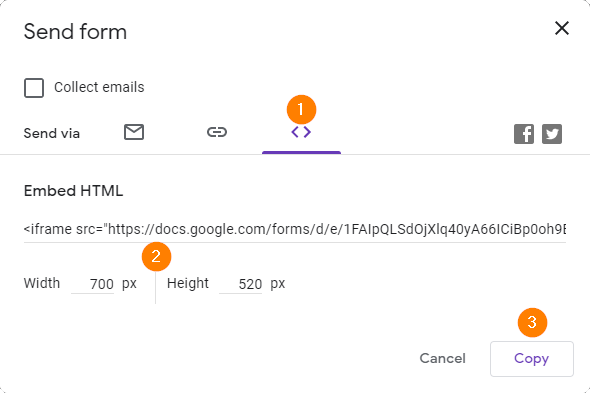
- Select the HTML Embed tab
- Adjust the Width and Height as required (optional)
- Click the Copy button to copy the HTML code
Paste the code from your Clipboard into the HTML page you created in your website folder for this purpose. Below is an example of an embedded Google Form:
14. HTML Tag Sheet
You will receive a copy of the following tag sheet with all practical assessments, including the Matric NSC Final P1 exam.
Your PAT is finished!